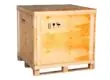
Surprisingly, there are many benefits to using custom wooden crates, such as custom sizing, better protection, and cost-efficiency. Custom-sized wood crates allow you to ship whatever you want, regardless of your item’s shape, size, or weight. Wood Crates can protect high-valued and fragile items, such as furniture, automotive parts, motorcycles, medical equipment, or other big/bulky products.
Wood crates have no limit on weight; it depends on how the crate is built. Depending on the item needed to ship, they can be customized in the interior or exterior. Custom wooden crates can prevent your shipment from getting damaged when shipping short or long distances from a lot of moving and lifting, as well as protection from moisture and temperature. Since wooden crates are made of plywood, also known as “engineered wood,” they allow for protection from moisture and can be insulated, if needed, to protect them from temperature.
Wooden crates are also known to be more cost-efficient in the long haul. Not only is wood the second cheapest material for securing items for transportation, but it is also eco-friendly and can be reused. Wooden crates can also help reduce transportation and storage costs if you need to store item(s) for the long term.
How to Build a Wood Crate: Tools / Supplies needed
To build a wood crate, you will need some materials, such as plywood panels ¼” or 3/8”, several 1×4’s or 2×4’s or 4×4’s depending on the item’s weight. The number of materials you will need will depend on the size of your crate. (For example, for a crate that is 40”x46”x26”, you will use 8ft. 2×4’s. For smaller and lightweight crates, you may want to use 1×4’s).
Before you get the materials necessary for your wood crate, you need to determine the dimensions of the item you need to crate. Add about 4 inches to all the parameters to allow space once the item is wrapped and cushioned. You are ready to build once the materials are purchased and adequately sized to the needed measurements.
You will need the following tools to help build the wood crate.
- Protective goggles & gloves
- Chop Saw
- Table / Panel Saw
- Drill
- Screws
- Nails
- Hammer
- Glue

How to Build a Wood Crate: The Plan
Before cutting anything, have a diagram of the dimensions needed to build each side of your wood crate. You should cut a list of the parts with all the dimensions (top, bottom, sides, and ends). Make sure you label the wood (“top,” “sides,” etc., or use initial letters) so you know which measurements are for which piece of wood when you are starting to cut the wood.
The crate parts’ dimensions should match the opposing side (top and bottom, right side and left side, and front and back ends). You will add 2-3 inches in both directions to the top and bottom measurements to allow for space for wrapping and cushioning. The standard for a wood crate is around 18” long, 12” wide, and 10” deep, so let’s use those dimensions for our assembly example but adjust the size as needed.
Assembling the base of your wood crate.
To create the base for your crate, you will need your base panel to rest on your (2×4 or 4×4) skids. Keep in mind to measure enough space on the bottom panel to screw the sides and ends into the base. Insert screws one at a time. Once the panel is complete, you can stand it vertically without your support.
Assembling the ends of the wood crate.
Pick up the end panel and rest it on top of two (2×4 or 4×4) skids for the top and bottom of the end panel, screw them together, and then attach two more skids to the right and left sides to complete the end panel. Repeat for the opposing end panel.
Assembling the sides of your wood crate.
Pick up the side panel and rest it on top of two (2×4 or 4×4) skids; apply all skids to the panel as you did for the end panels. Repeat the process for the opposing side panel and top panel.
Finishing your wood crate.
Start by screwing down the side panels to your base – screw along the edges, making sure they precisely adjoin the edges as well. Do the same with the end panels and attach all sides and ends to themselves. Now that your crate is almost complete, you must secure your item with the proper packing materials, such as bubble wrap, foam rubber, thick paper, etc. When finished, screw on the top panel, and you’re ready for shipment!